Automate Data File Uploads
What should be in a CSV file for Auto Notices?
Auto Notice CSV files must contain an email column if you are sending emails and a phone number column if you are sending text messages or voice calls. Make sure that your Student Information System or other data source system includes these columns when exporting data.
All other columns can be used to fill in your message template. This may include information such as the recipient's name which you can use to personalize the message for each recipient.
As an example, we are sending an attendance alert using Auto Notices. Here are the columns that we will use to send this Auto Notice:
| Student_Name | Status | Parent_Email | Parent_Phone |
| John Smith | away | [email protected] | 1234567890 |
| Jane Doe | tardy | [email protected] | 2345678901 |
| Jack Jones | away | [email protected] | 3456789012 |
The email address and phone number columns are required to provide the contact information to Auto Notices. The student name and status are optional and we will use them in this example to build a personalized message for each parent.
Using this message template for our attendance:
Hello, your child {{Student_Name}} was {{Status}} today.
The final message sent to each parent would look like:
Hello, your child John Smith was away today.
Hello, your child Jane Doe was tardy today.
Hello, your child Jack Jones was away today.
Ensure that your CSV contains the correct email address or phone number columns in each row to send your message to. Based on the content of the message you wish to send, consider other columns you may want to add to your CSV file to create the personalized message that you need for your Auto Notice.
SFTP file transfer information
You can find the SFTP server information for your CMS site in the Auto Notices page.
Use the server information here to automate the upload of your Auto Notice CSV file.
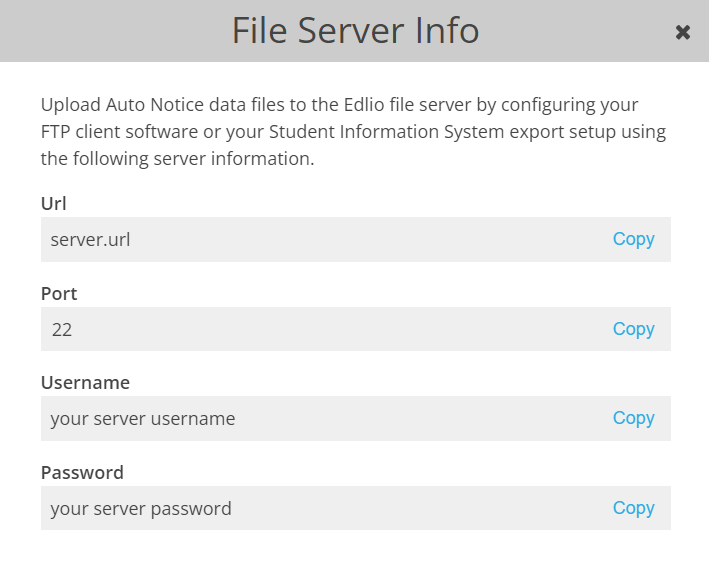
You can view this information at any time from the Auto Notices page.
Automate Data File uploads using your Student Information System
Many Student Information Systems provide a scheduled export and upload functionality. You can use this feature that is built-in to your existing Student Information System to automatically generate the CSV file and upload it to our file server.
Ensure that the CSV file that your Student Information System generates includes the recipient email address or phone number for each row of data.
Data uploads should be scheduled at least several minutes before the time an Auto Notice is scheduled to run in order to allow enough time for the upload to complete.
Contact your Student Information System provider for more information on how to automate this process.
Automate Date File uploads with a custom process
If your Student Information System does not provide automated export and upload functionality or you are extracting data from another system that does not have such functionality, then you will need to create a process yourself.
Building a custom automated process requires expert knowledge, so make sure that your team is capable of building a scheduled process to extract data from your Student Information System and upload it to our file server.
You may also consider handling this process manually by training a staff member to regularly extract and upload the CSV file just before the Auto Notice is scheduled to run.